An End-to-End Kubernetes Deployment Pipeline with Drone CI
The pipeline tutorial walks you through creating an end-to-end deployment pipeline using Drone CI, GitHub, and multiple Kubernetes clusters.
This tutorial will demonstrate how to propagate a Kubernetes deployment through multiple environments, each backed by a dedicated Kubernetes cluster, using a collection of Kubernetes manifest files across a set of GitHub repositories representing each environment.
The use of multiple Kubernetes clusters and GitHub repositories enables fine grained access control for each environment and streamlines automated build steps targeting those environments.
Inspiration
This tutorial takes HEAVY INSPIRATION from Kelsey Hightower’s Pipeline - Thanks, Kelsey!
The Application
This tutorial will set up a pipeline to deploy the pipeline application, a simple Go application with the following HTTP endpoints:
/- responds with “Hello world!”/health- responds with HTTP status code 200/version- responds with the application version (v2.0.0)
The Deployment Pipeline
The heavy lifting of the deployment pipeline is done by Drone CI and Kubernetes.
Take a moment to study the Drone CI build config files (.drone.yml) across the various GitHub repositories to get a sense of how the pipeline fits together:
- pipeline-application
- pipeline-application-infra-staging
- pipeline-application-infra-qa
- pipeline-application-infra-production
High Level Diagram
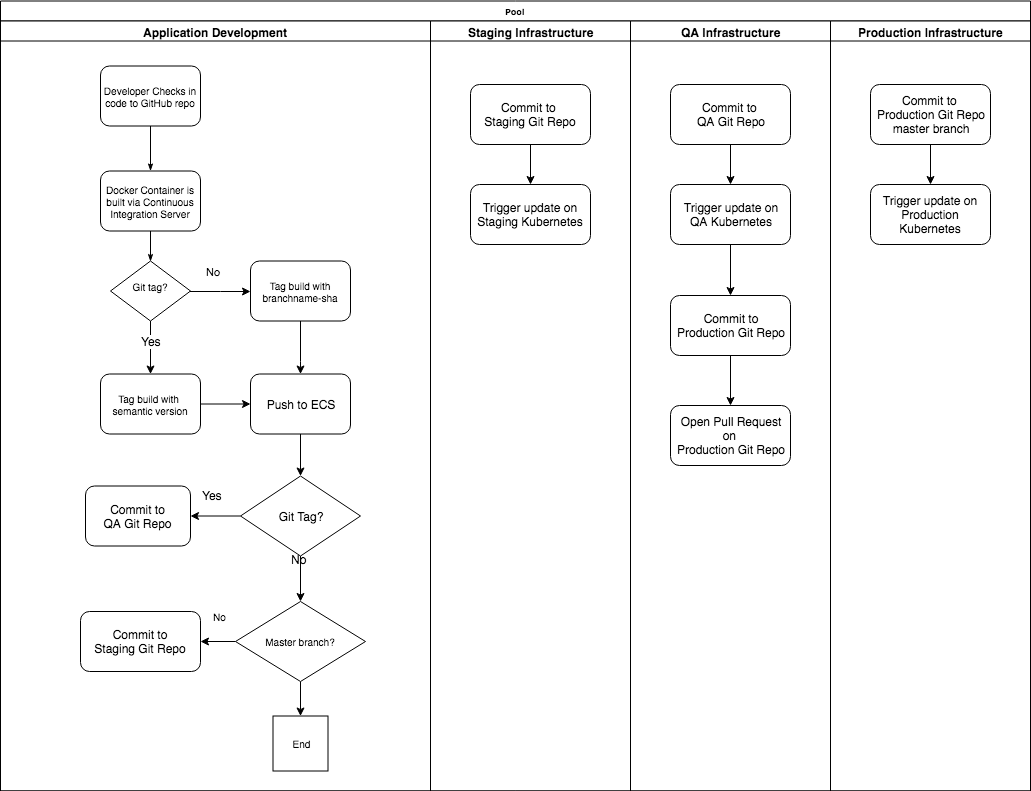
High Level Text Description
- changes pushed to any branch, except the master branch, on the pipeline application repo will trigger a container build and a git commit to the pipeline-application-infra-staging repo, which updates the pipeline deployment Kubernetes configuration file with the new container image.
- changes pushed to the pipeline-application-infra-staging repo will trigger a rolling deployment to a Kubernetes staging cluster.
- tags on the pipeline application repo will trigger a container build based on the tag name and a git commit to the pipeline-application-infra-qa repo, which updates the pipeline deployment Kubernetes configuration file with the new container image.
- changes pushed to the pipeline-application-infra-qa repo will trigger a rolling deployment to a Kubernetes QA cluster.
- successful deployments to QA will trigger a pull request on the pipeline-application-infra-production repo.
- changes pushed to the master branch on the pipeline-application-infra-production repo will trigger a rolling deployment to a Kubernetes production cluster.
The rolling update to the production cluster is gated by a pull request to the
pipeline-application-infra-productionrepo.
Prerequisites
In this section you will set up the necessary services and client tools required to complete this tutorial.
Services
The following services are required to complete this tutorial:
You will also need a hosting provider, the examples shown are based on Amazon AWS, but you can use a different provider.
Install the Client Tools
The following client tools are required to complete this tutorial:
Generate a GitHub API Token
In this section you will generate a GitHub API Token which will be used to automate the GitHub related tasks throughout this tutorial.
Generate a GitHub token using the official guide. While creating the token, set the token description to “pipeline-tutorial”, and check the repo and admin:repo_hook scopes.
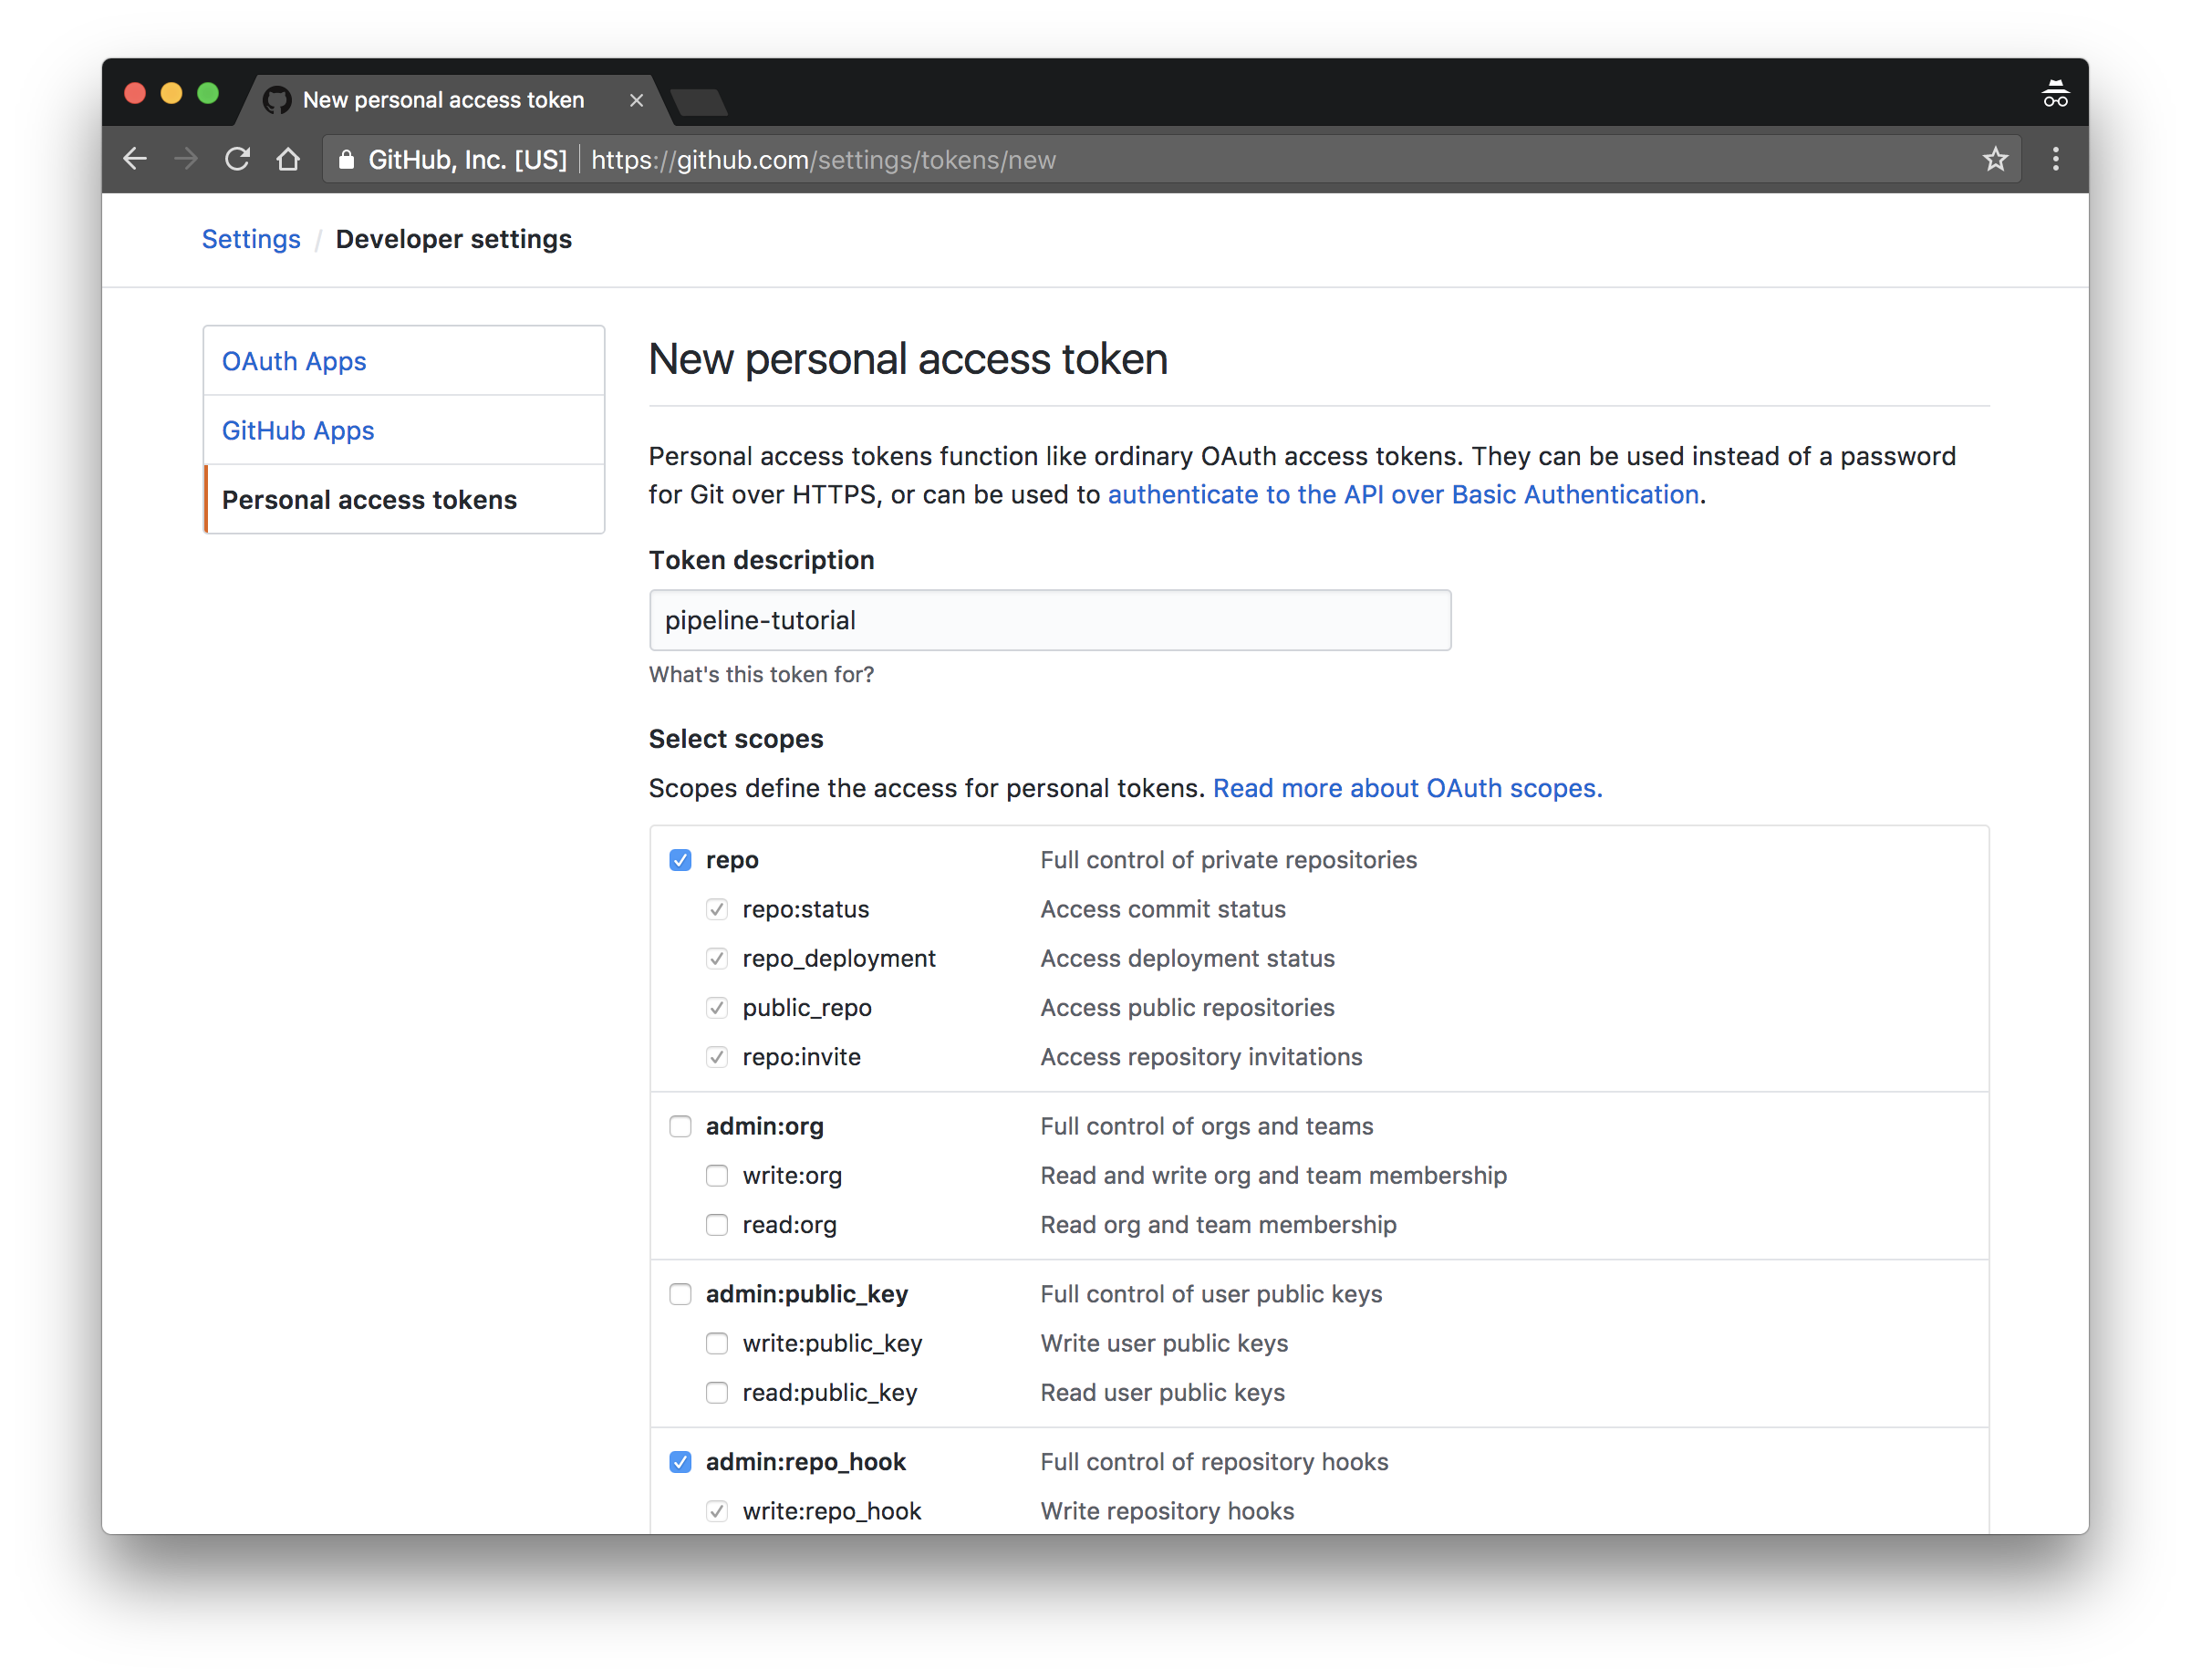
Write the token to the .pipeline-tutorial-github-api-token file in the current directory:
echo -n "<token>" > .pipeline-tutorial-github-api-token
Your GitHub username will be used to automate GitHub related tasks including forking the GitHub repositories necessary to complete this tutorial and creating GitHub webhooks. Save your GitHub username in the GITHUB_USERNAME env var:
export GITHUB_USERNAME="<github-username>"
Next: Provision the Kubernetes Clusters
Provision Kubernetes Clusters
In this section you will create a Kubernetes cluster using Kubernetes Kops for each of the following environments:
- staging
- qa
- production
Using dedicated Kubernetes clusters provides better isolation between environments which can result in simpler cluster configurations.
Create the Kubernetes Clusters
Set the list of environments:
ENVIRONMENTS=(
  staging
  qa
  production
)
Create a Kubernetes clusters for each environment
Please see these guides for installation instructions:
Basic cluster creation:
for e in ${ENVIRONMENTS[@]}; do
  kops create cluster --v=0 \
    --cloud=aws \
    --node-count=1 \
    --master-size=t2.medium \
    --master-zones=us-east-1a \
    --zones us-east-1a,us-east-1b \
    --name=${e} \
    --node-size=m3.xlarge \
    --ssh-key=~/.ssh/id_rsa.pub \
    --dns-zone ${e}.example.com 2>&1 | tee create_cluster-${e}.txt
done
It can take up to five minutes to provision the Kubernetes clusters. Use the kops command to check the status of each cluster:
kops get clusters
NAME        CLOUD       ZONES
staging     aws         us-east-1a,us-east-1b
qa          aws         us-east-1a,us-east-1b
production  aws         us-east-1a,us-east-1b
Next: Create a Hub Configuration File
Create a Hub Configuration File
In this section you will generate a hub configuration file to hold the GitHub credentials generated in the prerequisites lab. The hub configuration file is used by the hub command when automating GitHub related tasks.
Generate the Hub Configuration File
Create a hub configuration file in the current directory:
cat <<EOF > hub
github.com:
  - protocol: https
    user: ${GITHUB_USERNAME}
    oauth_token: $(cat .pipeline-tutorial-github-api-token)
EOF
Set the HUB_CONFIG environment variable to point to the generated hub configuration file:
HUB_CONFIG="${PWD}/hub"
Encrypt the Hub Configuration File and Upload to S3
In this section you will encrypt the hub configuration file using the AWS Key Management Service (KMS) and upload the encrypted file to a Amazon S3 bucket. Performing these tasks will make the hub configuration file securely available to any automated build steps performed by Drone.
Create a KMS Encryption Key
A KMS encryption key is required to encrypt the hub configuration file.
Generate a new encryption key (copy the “KeyArn” returned from this command):
aws kms create-key --description github
Create an alias for the encryption key (uses the “KeyArn” from previous command):
aws kms create-alias \
  --alias-name alias/github \
  --target-key-id <KeyARN>
Encrypt the hub configuration file using the github encryption key:
aws kms encrypt \
  --key-id "alias/github" \
  --plaintext "fileb://${HUB_CONFIG}" \
  --query CiphertextBlob \
  --output text > hub.enc
The encrypted hub configuration file hub.enc is now available in the current directory.
Upload the Encrypted Hub Configuration File to S3
In this section you will create a S3 bucket and upload the encrypted hub configuration file to it.
Determine a unique bucket name and store it in the S3_HUB_CONFIG_BUCKET env var:
S3_HUB_CONFIG_BUCKET=example-pipeline-configs
Create a S3 bucket that will hold the encrypted hub configuration file:
aws s3 mb s3://${S3_HUB_CONFIG_BUCKET}
Upload the encrypted hub configuration file to the pipeline configs S3 bucket:
aws s3 cp hub.enc gs://${S3_HUB_CONFIG_BUCKET}/
Grant the Drone CI Service Account Access to the GitHub Encryption Key
In this section you will grant access to the github encrypt key to the Drone CI service account. Performing these steps will enable Drone CI to decrypt the hub configuration file during any automated build.
Copy the following into policy-document.json, replacing <<KeyArn>> with your KeyArn from above:
{
    "Version": "2012-10-17",
    "Statement": {
        "Effect": "Allow",
        "Action": [
            "kms:Encrypt",
            "kms:Decrypt"
        ],
        "Resource": [
            "<KeyArn>"
        ]
    }
}
Create an IAM policy for access to the KMS Key (save the “PolicyArn” from the response):
aws iam create-policy \
  --policy-name kms-github-key \
  --policy-document file://policy-document.json
Grant the Drone service account access to the github encryption key:
There are a number of ways to do this, but we will assume that you’ve created a drone-service-role role and already assigned that role to the Drone CI instance(s).
Attach Role Policy
aws iam attach-role-policy \
  --role-name drone-service-role \
  --policy-arn <PolicyArn>
There is also attach-group-policy and attach-user-policy, depending on your particular setup.
Next: Setup the GitHub Repositories
Setup the GitHub Repositories
In this section you will create a set of GitHub repositories which hold the Drone CI build pipelines and the pipeline application code.
Fork the Pipeline Application and Infrastructure Repositories
In this section you will fork the following GitHub repositories to your own GitHub account:
- pipeline-application
- pipeline-application-infra-staging
- pipeline-application-infra-qa
- pipeline-application-infra-production
Take a moment to review the each GitHub repository and step through the directory structure.
Set the list of repository names:
REPOS=(
  pipeline-application
  pipeline-application-infra-staging
  pipeline-application-infra-qa
  pipeline-application-infra-production
)
Fork the pipeline application and infrastructure repositories:
for repo in ${REPOS[@]}; do
  hub clone "https://github.com/dellintosh/${repo}.git"
  cd ${repo}/
  hub fork
  cd -
  rm -rf ${repo}
done
At this point the pipeline application and infrastructure repositories have been forked to your GitHub account and can used as part of your own deployment pipeline.
Next: Drone CI Build Pipeline
Drone CI Build Pipeline
In this section you will configure the Drone CI build pipeline necessary to establish an end-to-end build pipeline.
Prerequisites
Ensure that you have completed all steps in the prerequisites lab
Build Pipeline Configurations
In this section you will update the necessary .drone.yml build pipeline configurations that will be used in the pipeline.
for e in ${ENVIRONMENTS[@]}; do
  hub clone ${GITHUB_USERNAME}/pipeline-application-infra-${e}
done
Update the pipeline-application configuration
Replace the following values in the pipeline-application/.drone.yml file and add/commit/push:
- DOCKER_USERNAME - DockerHub username (create repository for
pipeline-applicationand grant access) - S3_KOPS_STATE_STORE - S3 Bucket name where Kops configurations are stored
- S3_HUB_CONFIG_BUCKET - S3 Bucket name where Hub credentials are stored
- GITHUB_ACCOUNT - GitHub email attached to Hub credentials
Update the pipeline-application-infra-staging configuration
Replace the following values in the pipeline-application-infra-staging/.drone.yml file and add/commit/push:
- S3_KOPS_STATE_STORE - S3 Bucket name where Kops configurations are stored
Update the pipeline-application-infra-qa configuration
Replace the following values in the pipeline-application-infra-qa/.drone.yml file and add/commit/push:
- S3_KOPS_STATE_STORE - S3 Bucket name where Kops configurations are stored
- S3_HUB_CONFIG_BUCKET - S3 Bucket name where Hub credentials are stored
- GITHUB_ACCOUNT - GitHub email attached to Hub credentials
Enable Repositories in Drone CI
In this section you will enable the repositories in Drone CI:
drone repo sync
for e in ${ENVIRONMENTS[@]}; do
  drone repo add ${GITHUB_USERNAME}/pipeline-application-infra-${e} && \
  drone repo update --trusted ${GITHUB_USERNAME}/pipeline-application-infra-${e}
done
At this point, you should be able to login to your Drone CI server and verify that the repositories are enabled. You are now ready to test the pipeline.
Next: Test the Pipeline
Test the Pipeline
In this section you will test the Drone CI build pipeline by making modifications to the pipeline application and observing how each change propogates through the staging, qa, and production environments.
Retrieve the Kubernetes cluster pods
Set the list of environments:
ENVIRONMENTS=(
  staging
  qa
  production
)
Verify no pods are currently running in any environment:
for e in ${ENVIRONMENTS[@]}; do
  kubectl get pods --context ${e}
done
Modify the Pipeline Application
In this section you will modify the pipeline application and push the changes to a new branch on your pipeline-application GitHub repository.
Configure git to ensure the hub command line utility uses the HTTPS protocol when working with GitHub repositories:
git config --global hub.protocol https
Configure a git credential helper to use the hub-credential-helper utility when authenticating to GitHub:
git config --global credential.https://github.com.helper /usr/local/bin/hub-credential-helper
Clone the pipeline-application GitHub repository to the current directory:
hub clone ${GITHUB_USERNAME}/pipeline-application
Change into the pipeline-application directory and create a new branch named new-message:
cd pipeline-application
git checkout -b new-message
Modify the message return for HTTP requests to the pipeline application:
sed "s/world/${GITHUB_USERNAME}/g" main.go > main.go.new
mv main.go.new main.go
The syntax for in-place sed updates does not work consistently across operating systems so we are forced to create a temporary file and use it to overwrite the target of our changes.
Review the changes to the pipeline application:
git diff
diff --git a/main.go b/main.go
index 2f76589..0b08a59 100644
--- a/main.go
+++ b/main.go
@@ -21,7 +21,7 @@ func main() {
        log.Println("Starting pipeline application...")

        http.HandleFunc("/", func(w http.ResponseWriter, r *http.Request) {
-               fmt.Fprintf(w, "Hello world!\n")
+               fmt.Fprintf(w, "Hello dellintosh!\n")
        })

        http.HandleFunc("/health", func(w http.ResponseWriter, r *http.Request) {
Commit the changes and push the new-message branch to the pipeline-application GitHub repository:
git add main.go && git commit -m "change message" && git push origin new-message
Review the current builds:
drone build last ${GITHUB_USERNAME}/pipeline-application
for e in ${ENVIRONMENTS[@]}; do
  drone build last ${GITHUB_USERNAME}/pipeline-application-infra-${e}
done
Pushing a new branch to the pipeline-application GitHub repository will trigger the staging-build pipeline, which will in turn trigger the staging-infra build:
The staging-infra build step pushes a commit to the pipeline-application-infra-staging GitHub repository.
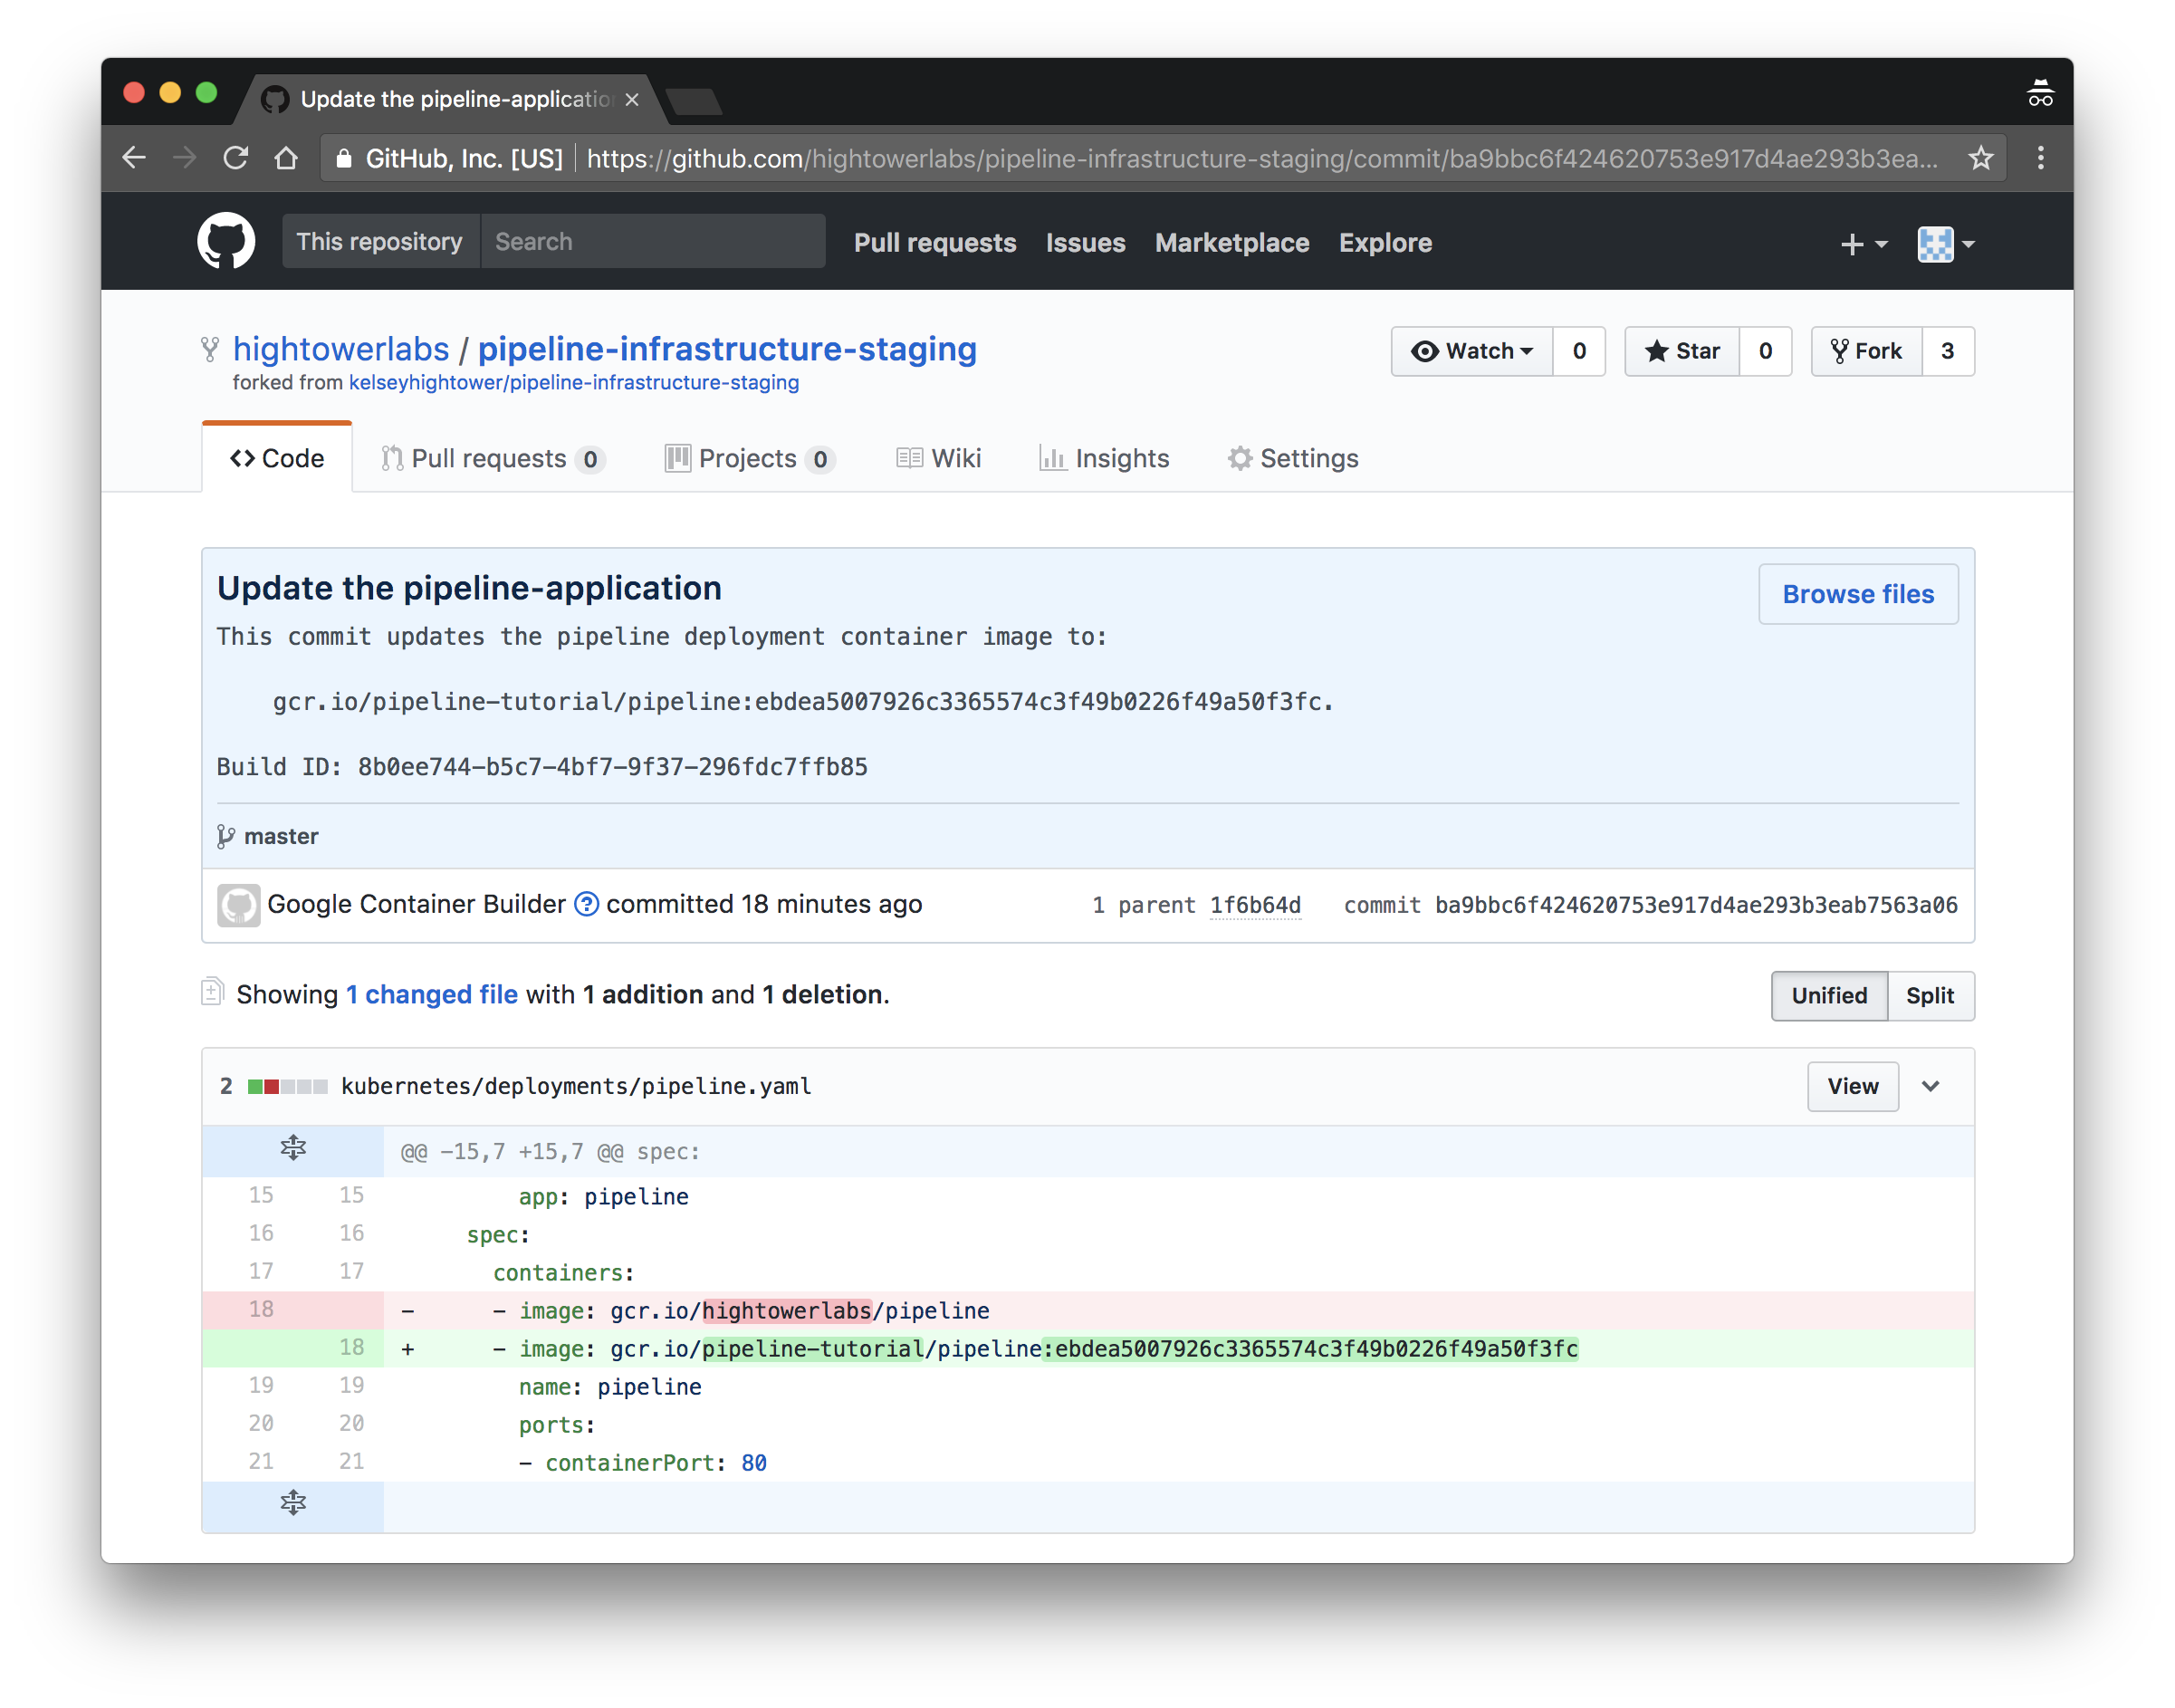
List the pods created by the staging-deployment build trigger:
kubectl get pods \
  --context staging
NAME                                   READY     STATUS    RESTARTS   AGE
pipeline-application-389525417-68nxn   1/1       Running   0          1m
Verify the changes:
SERVICE_IP_ADDRESS=$(kubectl get svc pipeline-application \
  --context staging \
  -o jsonpath="{.status.loadBalancer.ingress[0].ip}")
curl http://${SERVICE_IP_ADDRESS}
Tag the pipeline-application Repo
In this section you will merge the new-message and master branches, then create a new tag on the pipeline-application GitHub repository, which will trigger a new pipeline container image to be built and deployed to the QA Kubernetes cluster.
Checkout the master branch:
git checkout master
Merge the new-message and master branches and push the changes to the pipeline-applicaiton GitHub repository:
git merge new-message && git push origin master
Create a new v1.0.0 tag and push it to the pipeline-applicaiton GitHub repository:
git tag v1.0.0 && git push origin --tags
Pushing a new tag to the pipeline-applicaiton GitHub repository will trigger the qa-build build trigger, which will in turn trigger the qa-infra build.
The qa-infra build step pushes a commit to the pipeline-application-infra-qa GitHub repository.
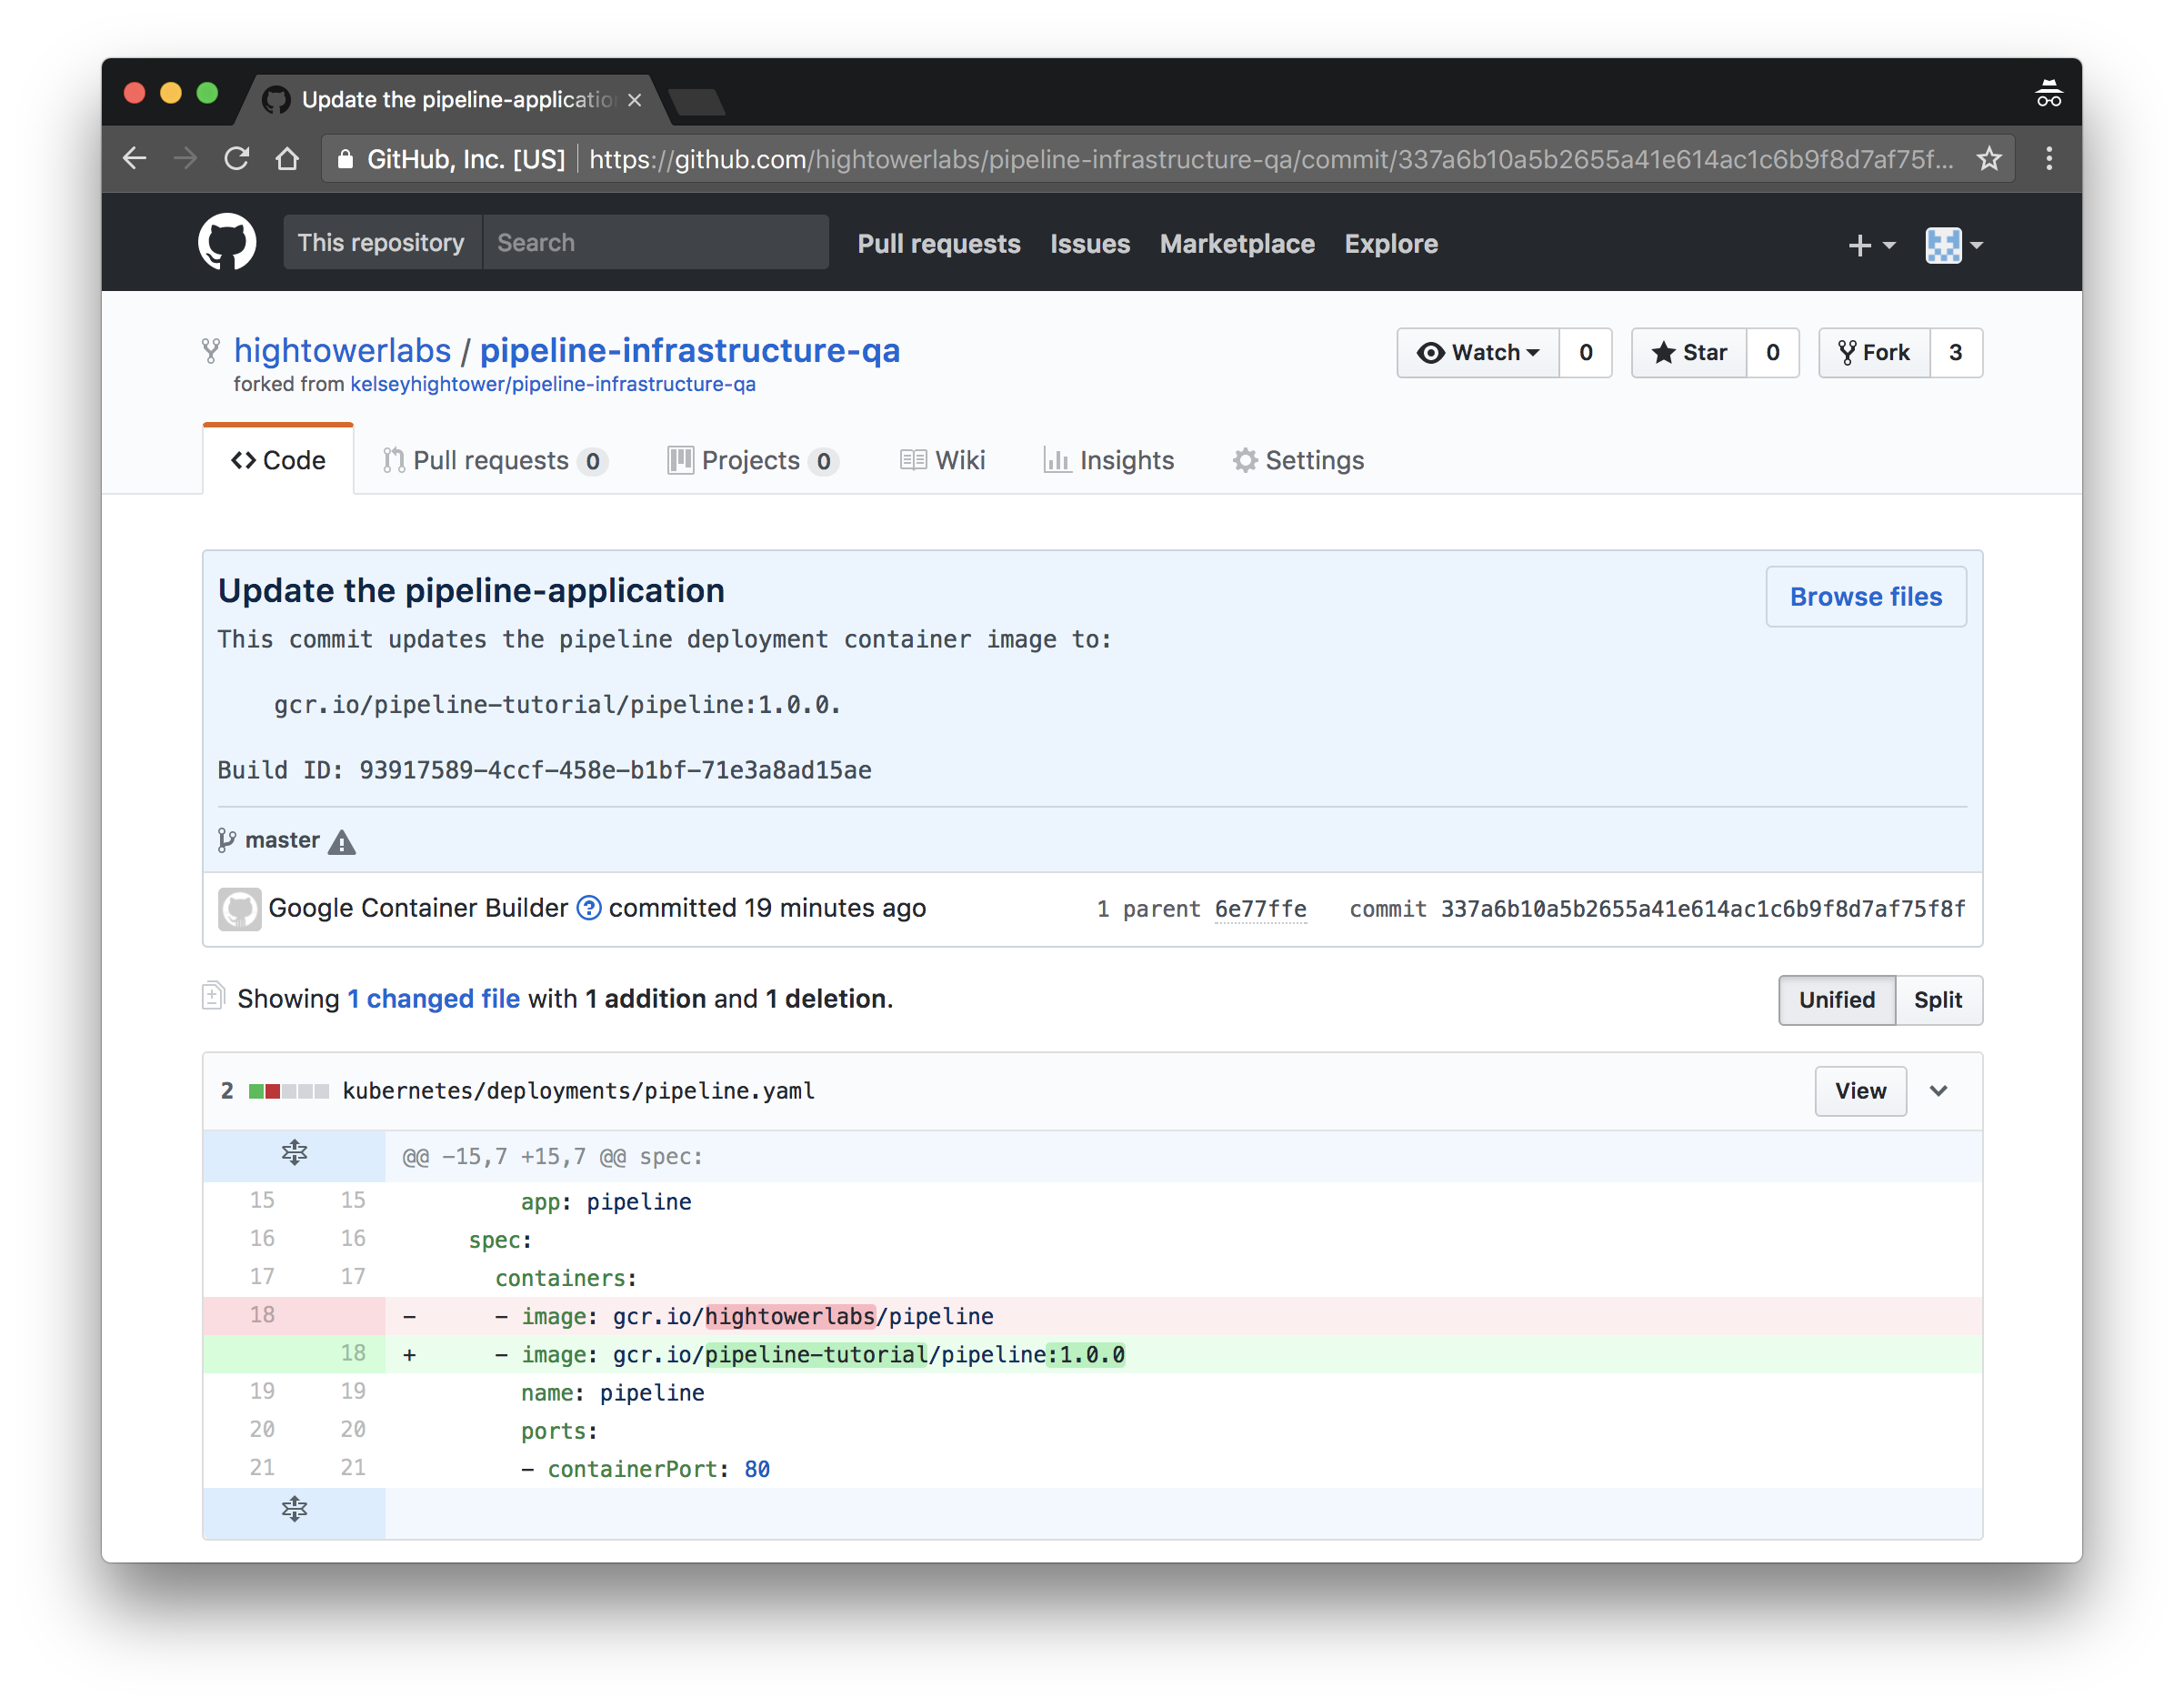
Review the current builds:
Notice a new Docker image was created based on the
v1.0.0tag pushed to thepipeline-applicationGitHub repository.
List the pods created by the qa-deployment build trigger:
kubectl get pods \
  --context qa
NAME                                   READY     STATUS    RESTARTS   AGE
pipeline-application-685432654-h4zhc   1/1       Running   0          1m
Hit the pipeline application in the QA cluster:
SERVICE_IP_ADDRESS=$(kubectl get svc pipeline-application \
  --context qa \
  -o jsonpath="{.status.loadBalancer.ingress[0].ip}")
curl http://${SERVICE_IP_ADDRESS}
Once the pipeline application is deployed to the QA cluster a pull request is sent to the pipeline-application-infra-production GitHub repository. Review and merge the PR on GitHub:
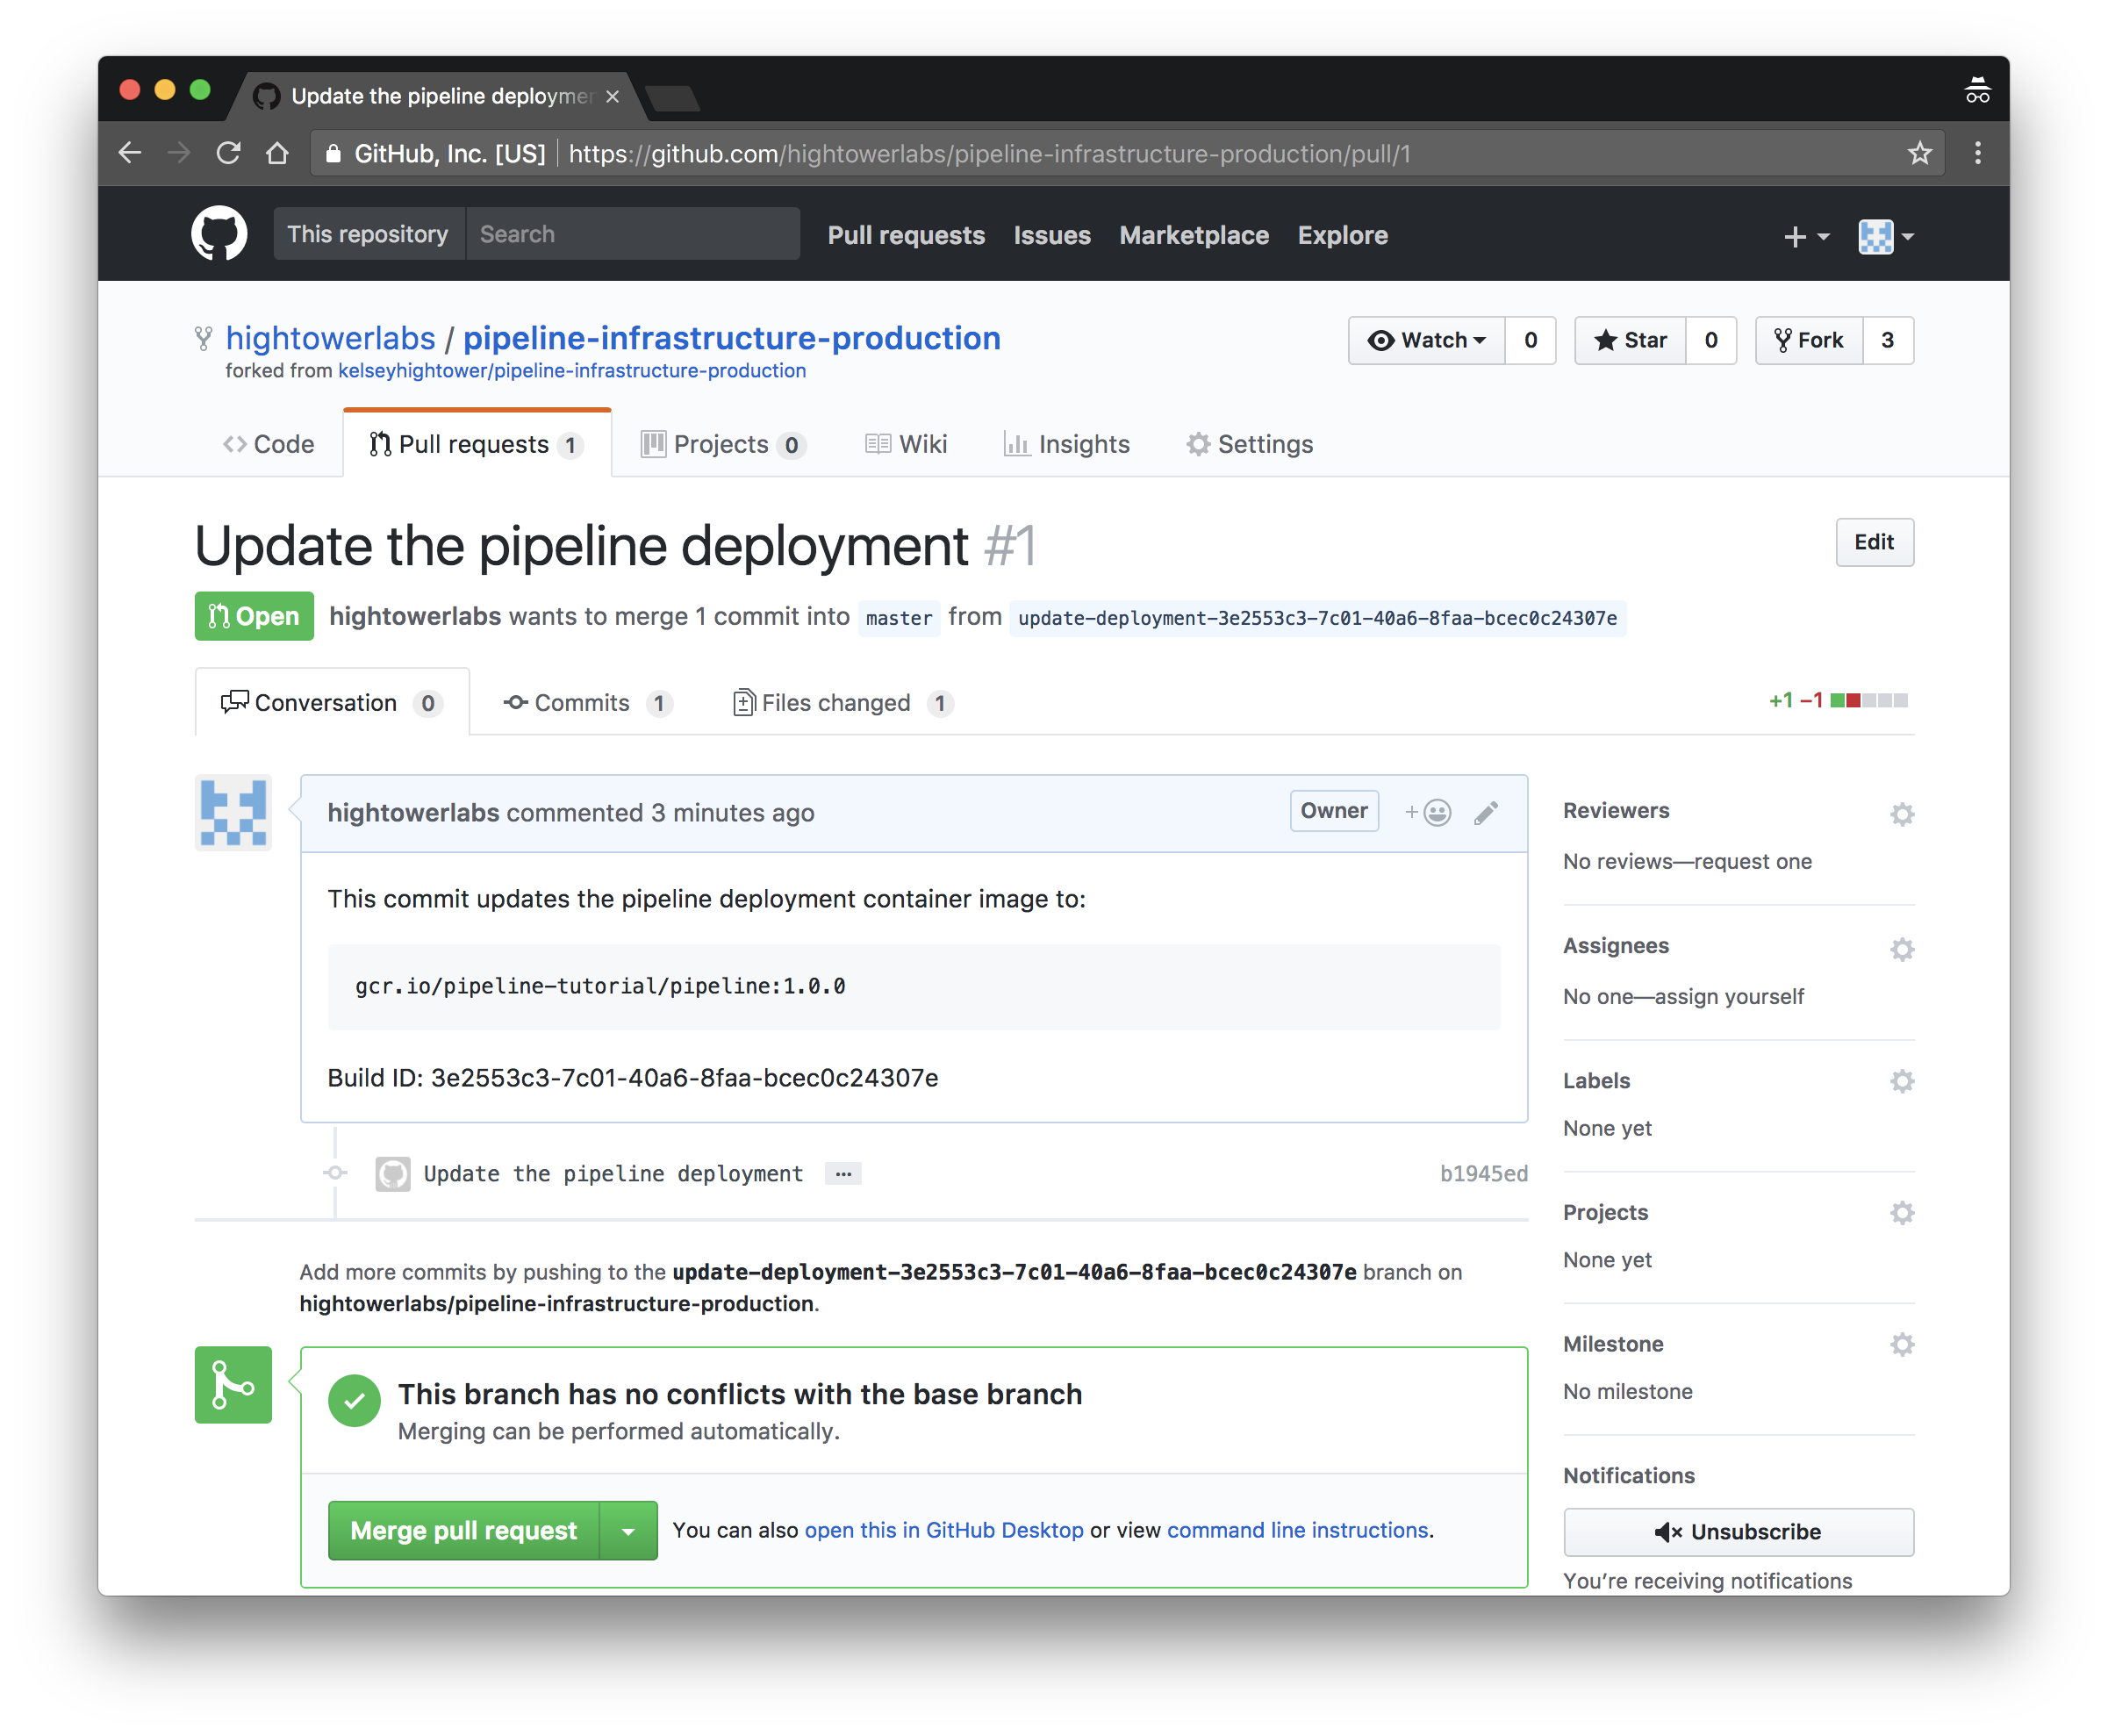
Merging the pull-request on the pipeline-application-infra-production GitHub repository will trigger the production-deployment build trigger.
List the pods created by the production-deployment build trigger:
kubectl get pods \
  --context production
NAME                                   READY     STATUS    RESTARTS   AGE
pipeline-application-685432654-gndw1   1/1       Running   0          35s
Hit the pipeline application in the production cluster:
SERVICE_IP_ADDRESS=$(kubectl get svc pipeline-application \
  --context production \
  -o jsonpath="{.status.loadBalancer.ingress[0].ip}")
curl http://${SERVICE_IP_ADDRESS}
At this point the pipeline-application:v1.0.0 container image has been propagated across each environment and is now running in the production Kubernetes cluster.
Cleanup
Delete Kubernetes Clusters
Delete the Kubernetes clusters created in the kubernetes lab.
ENVIRONMENTS=(
  staging
  qa
  production
)
Run the kops delete cluster command:
for e in ${ENVIRONMENTS[@]}; do
  kops delete cluster --name ${e}
done
Verify that the information returned is correct, then to PERMANENTLY DELETE the Kubernetes clusters:
for e in ${ENVIRONMENTS[@]}; do
  kops delete cluster --name ${e} --yes
done
Delete GitHub Repositories
In this section you will cleanup the GitHub repositories created during this tutorial.
REPOS=(
  pipeline-application
  pipeline-application-infra-staging
  pipeline-application-infra-qa
  pipeline-application-infra-production
)
for repo in ${REPOS[@]}; do
  curl -X DELETE "https://api.github.com/repos/${GITHUB_USERNAME}/${repo}"
done